Envibe: How to configure an Upfront Membership
There are three components are required to configure an upfront membership:
1. Upfront Membership Categories
To create Upfront Membership Categories:
1. Launch DATA MANAGEMENT.
2. Search and select Membership Categories.
3. Click NEW.
4. Enter a name for the membership category, e.g. Community Upfront Memberships, Student Upfront Memberships.
5. Sales level – pricing markdowns implicit to a membership type are specific by a sales level.
6. Access Type – Gate entry configuration.
7. Included Admission Type – include preconfigured admission types. What can be accessed if a customer holds this membership?
8. Applicable Site Record – applicable site record for this category. If left blank will default to all sites.
9. Allow linked – allows members to be linked, e.g. for Family memberships.
10. Allow tokens – the term “Token” relates to a membership card in Envibe. If this option is selected, Envibe will prompt the user to enter a token number when registering a member for this membership.
11. Allow suspension – the memberships connected to the category can be suspended.
12. Require start day – selecting a specific day for the membership category to start on. Not a mandatory field.
13. Require end period – when this membership’s period will expire days, months, years. Not a mandatory field.
14. Is disabled – if this option is ticked, the Membership Category will be disabled from usage and will not appear during the membership registration process.
2. Upfront membership Types
There can be various Membership Types within a Membership Category. For example, the Student Upfront Membership category could include Student Upfront 1 Month, Student Upfront 3 Months and Student Upfront 6 Months Membership Types.To create a Membership Type:
1. Launch DATA MANAGEMENT.
2. Search and select Membership Type.
3. Click NEW.
4. Enter a Name for the membership type, e.g. Student Upfront 1 Month.
5. Select the Membership Category from the dropdown.
6. If applicable, enter a specific Start Date for the membership type.
7. Set the Expiry Type by selecting between Date or Period. Date refers to a specific end date, while period refers to the length of time a membership will be active.
8. If Expiry Type – Date was selected, enter the expiry date. If Expiry Type – Period was selected, enter the expiry period, e.g. 1 Month, 12 Months.
9. Debit Type is not applicable for upfront membership types. Leave this blank
10. Stock Type – if a POS item is sold with a membership, e.g. a Membership Card
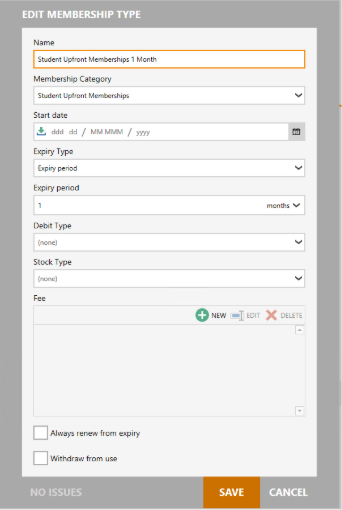
Fee – relates to additional charges for the membership, e.g. a joining fee. NOTE: The item will need to be configured prior to linking. - 11. Always renew from expiry – Not applicable for Upfront Memberships.
- 12. Withdraw from Use – if selected, the membership type is no longer available to the user.
- 13. Click SAVE.
3. Upfront Membership Type Item
For the configuration for an upfront membership to be fully completed, a corresponding cost Item will need to be created and linked to the Membership Type.
To create a Membership Item:
1. Launch DATA MANAGEMENT.
2. Click ITEMS.
3. Click NEW.
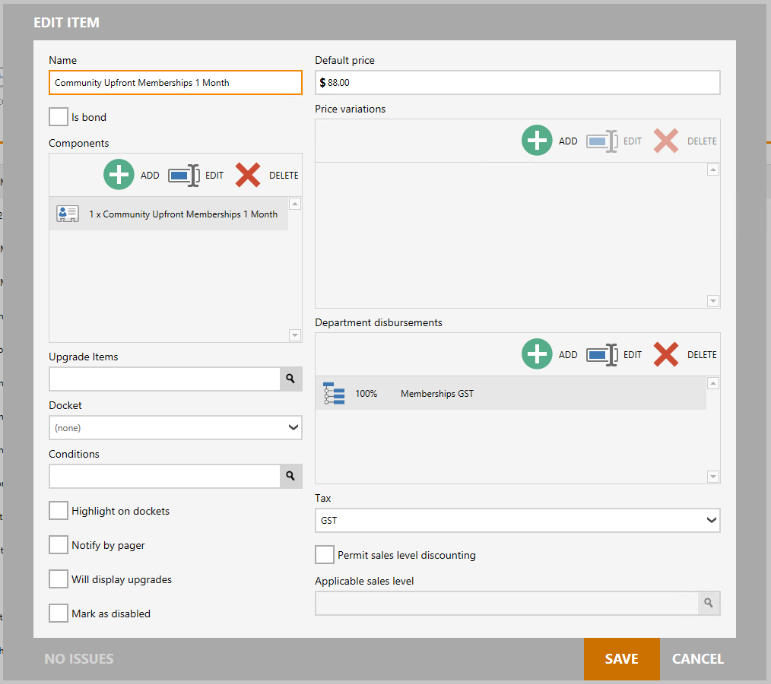
4. Enter a Name, e.g. Student Upfront Membership 1 Month.
5. Enter a Default Price – the cost of the membership type.
6. Components – this is where the Item will be linked to the Membership Type.
a. Click ADD.
b. Leave Quantity at 1.
c. Click Item Type and select Membership Type from the list.
d. Click Membership Type and select the previously configured membership type form the list.
7. Department Disbursement – each item allows disbursements to multiple departments or assignments.
8. Tax – if this is a tax-chargeable item, select GST.
9. Permit Sales Level Discounting – this option will only be enabled if this item/charge has a sales level discount applied.
10. Applicable Sales Level – works together with the above option where a permitted sales level would need to be applied
11. Click SAVE.
To create a Membership Type:
1. Launch DATA MANAGEMENT.
2. Search and select Membership Type.
3. Click NEW.
4. Enter a Name for the membership type, e.g. Student Upfront 1 Month.
5. Select the Membership Category from the dropdown.
6. If applicable, enter a specific Start Date for the membership type.
7. Set the Expiry Type by selecting between Date or Period. Date refers to a specific end date, while period refers to the length of time a membership will be active.
8. If Expiry Type – Date was selected, enter the expiry date. If Expiry Type – Period was selected, enter the expiry period, e.g. 1 Month, 12 Months.
9. Debit Type is not applicable for upfront membership types. Leave this blank
10. Stock Type – if a POS item is sold with a membership, e.g. a Membership Card
- 11. Always renew from expiry – Not applicable for Upfront Memberships.
- 12. Withdraw from Use – if selected, the membership type is no longer available to the user.
- 13. Click SAVE.
3. Upfront Membership Type Item
For the configuration for an upfront membership to be fully completed, a corresponding cost Item will need to be created and linked to the Membership Type.
To create a Membership Item:
1. Launch DATA MANAGEMENT.
2. Click ITEMS.
3. Click NEW.
4. Enter a Name, e.g. Student Upfront Membership 1 Month.
5. Enter a Default Price – the cost of the membership type.
6. Components – this is where the Item will be linked to the Membership Type.
a. Click ADD.
b. Leave Quantity at 1.
c. Click Item Type and select Membership Type from the list.
d. Click Membership Type and select the previously configured membership type form the list.
7. Department Disbursement – each item allows disbursements to multiple departments or assignments.
8. Tax – if this is a tax-chargeable item, select GST.
9. Permit Sales Level Discounting – this option will only be enabled if this item/charge has a sales level discount applied.
10. Applicable Sales Level – works together with the above option where a permitted sales level would need to be applied
Related Articles
Envibe: How to configure Membership Discount Codes
Question How can I configure a membership promo code. Answer Promo codes can be configured to discount the purchase of an upfront membership on the customer web portal. Steps to Configure a Discount (Promo Code): 1. Configure the Discount 2. ...Envibe: How to configure a Direct Debit Membership
Question How do I configure Direct Debit Memberships Answer Direct Debit memberships are subscriptions that are made in ongoing instalments via a debit plan. Four components are required to configure a Direct Debit Membership: Unlike Upfront ...Envibe: How to Invoice a Membership
Question How do I invoice a membership? Answer In the scenario where a customer requires an invoice for a membership, the following workflow can be used. To invoice a membership: 1. Launch INTERACTIONS 2. Click REGISTER 3. Select the contact who is ...Envibe: How to do bulk Membership suspensions
Question How can I bulk suspend members. Answer For scenarios where many specific categories of members need to be put on suspension, the Membership Bulk Suspension tool can be utilised. To process a bulk suspension: 1. Launch DATA MANAGEMENT. 2. ...Envibe: How to configure Join Fee Discount for Membership Promotion
Question How can I configure a membership discount on the joining fee for a membership promotion? Answer This is a discount on the joining fee (if applicable) for a membership on sign up. Joining Fee discount applies to Interactions, the customer web ...